The slight dip in your solar panel generation after a few years isn’t just inevitable aging; it’s often a combination of manageable technical factors unique to the UK climate.
- Excessive summer heat can reduce power more than you think, a different problem from low winter sun.
- Installers’ “optimal” settings, like inverter size, are often economic trade-offs that are crucial to understand.
- UK-specific issues like lichen growth and nesting birds cause more than just dirt; they pose a real risk to your hardware if ignored.
Recommendation: Shift your focus from worrying about panel degradation to actively managing the preventable losses within your system—from cleaning techniques to understanding your warranties and export tariffs.
As a UK solar panel owner, you’ve likely enjoyed several years of reduced electricity bills and the satisfaction of generating your own clean energy. But perhaps you’ve recently checked your generation meter or app and noticed a nagging thought: “Is it producing as much as it used to?” It’s a common concern. The immediate assumption is often dirt on the panels or the dreaded, inevitable degradation of the cells themselves. While these factors play a role, they are far from the whole story.
The standard advice to “just get them cleaned” or “check the inverter” barely scratches the surface. The reality of maintaining peak performance in the variable British weather is more nuanced. It involves understanding a series of performance trade-offs that were likely made during your system’s design and installation—choices that made perfect sense at the time but require informed management today. The real key to long-term efficiency isn’t just fighting dirt; it’s about understanding the systemic health of your entire installation.
This guide moves beyond the basics. We will dissect the technical reasons your output might be dipping, from the counter-intuitive effect of a hot July day to the financial argument for “undersizing” an inverter. We’ll explore practical, UK-focused maintenance for issues like lichen and bird proofing, and demystify the warranties that actually matter. This is a technician’s view on keeping your solar investment working at its hardest, long after the initial installation shine has worn off.
This article provides a detailed breakdown of the critical maintenance and performance aspects for UK solar owners. The following summary outlines the key topics we will cover to help you navigate your system’s long-term health.
Summary: A Technician’s Manual for Long-Term UK Solar Panel Performance
- Why Do Solar Panels Generate Less Power on Hot July Days?
- How to Clean Lichen off Solar Panels Without Damaging the Coating?
- Product Warranty vs Performance Guarantee: Which One Matters More?
- The Inverter Clipping Debate: Is It Bad to Undersize Your Inverter?
- How Do Bypass Diodes Save Your Generation When a Chimney Casts a Shadow?
- The Bird Proofing Error That Costs £500 to Fix Later
- The Garage vs Loft Debate: Where Is the Safest Place to Install Batteries?
- Are Solar Panels Still Worth It in the UK Without the Feed-in Tariff?
Why Do Solar Panels Generate Less Power on Hot July Days?
It’s a paradox that confuses many solar owners: your highest generation days are often on bright, cool spring afternoons, not the scorching hot days of July or August. The reason is simple physics. Solar panels are electronic devices, and like most electronics, they work less efficiently when they overheat. While they need light (irradiance) to generate power, excessive heat increases the resistance within the silicon cells, causing a measurable drop in voltage and, consequently, total power output.
This isn’t a minor fluctuation. During the UK’s record-breaking summer of 2022, when temperatures soared, many systems saw a significant performance dip. Analysis based on Met Office data from the 2022 UK heatwave suggests panels could lose 10-15% of their efficiency on the hottest days. Every solar panel has a “temperature coefficient” rating on its datasheet, typically around -0.3% to -0.5% per degree Celsius. This figure represents the percentage of power lost for every degree the panel’s temperature rises above the standard test condition of 25°C.
On a 30°C summer day, the surface of a black solar panel on a roof can easily reach 50°C or more. A panel with a -0.4% coefficient operating at 50°C will be experiencing a 10% reduction in its potential output compared to its performance at 25°C. While you can’t change the weather, understanding this effect is crucial. It helps you recognise that a summer dip isn’t necessarily a fault, but a predictable performance characteristic of your system. It also highlights the importance of good air circulation behind the panels, which is determined by the mounting system your installer chose.
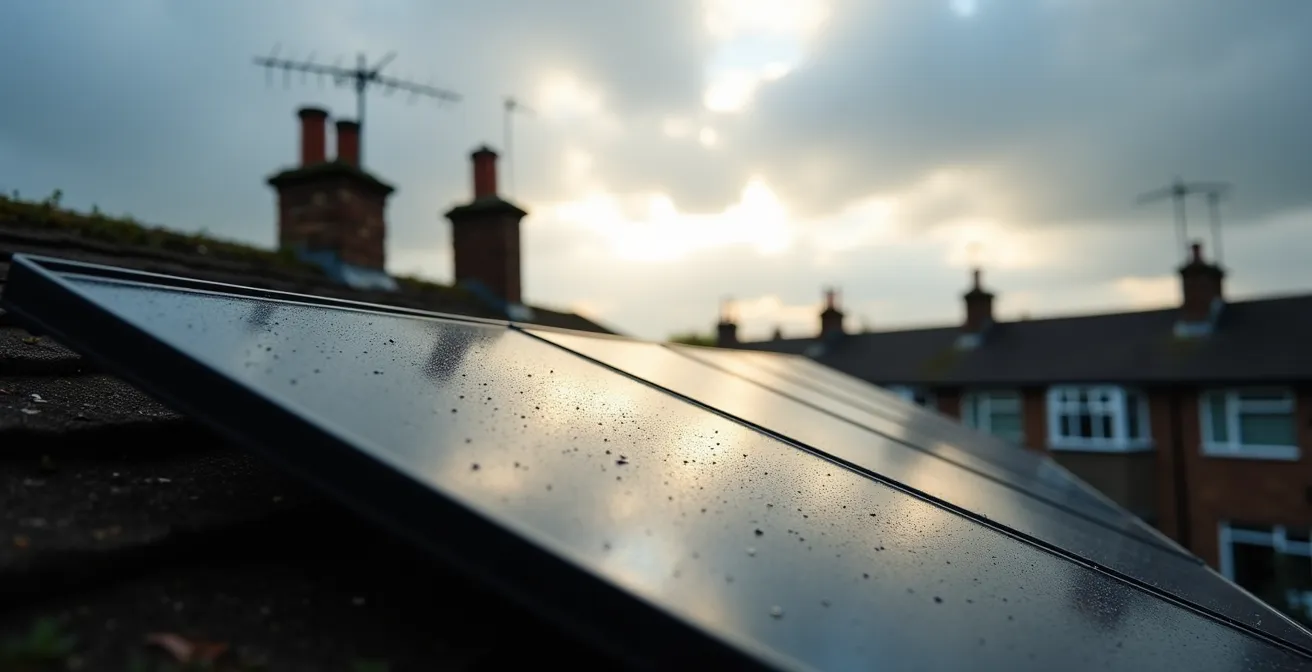
How to Clean Lichen off Solar Panels Without Damaging the Coating?
While a light layer of dust has a surprisingly minimal effect on panel output and is often washed away by British rain, a more stubborn problem plagues many UK systems: lichen. These hardy, slow-growing organisms can form a strong bond with the anti-reflective coating on your panels, and if left unchecked, they can cause significant shading on the affected cells, reducing your system’s output. Unlike dust, lichen won’t wash off in the rain and requires specific action.
The absolute first rule of cleaning lichen is: do not use abrasive scrapers or harsh chemicals. The surface of your panel is a specially engineered layer of glass with an anti-reflective coating. Scratching this surface with a metal blade or damaging the coating with aggressive solvents can cause permanent damage, reducing its efficiency far more than the lichen ever could. It can also void your product warranty.
The correct method requires patience. Start by using a soft brush and plain water to remove any loose debris. For the lichen itself, a soft plastic or nylon scraper (like a car ice scraper) can be used very gently to dislodge the main body of the growth. It’s crucial to apply minimal pressure. Specialised, industry-approved cleaning solutions are available that can help soften the lichen, making it easier to remove without force. Always follow the manufacturer’s instructions, and perform a spot test on a small corner first. For extensive growth, especially on a hard-to-reach roof, professional cleaning is the safest option. The Energy Saving Trust reports that professional cleaning costs are often a worthwhile investment to ensure the job is done safely and without damaging your expensive assets.

As this image illustrates, the process involves careful, targeted work. A professional service not only has the right tools and safety equipment for working at height but also the experience to know how much pressure is safe to apply. They can often identify other potential issues with your system during the visit, providing valuable preventative maintenance.
Product Warranty vs Performance Guarantee: Which One Matters More?
When you bought your solar panels, you were likely presented with impressive 25-year warranties. But one of the biggest misunderstandings for solar owners is the difference between the two main types of cover: the Product Warranty and the Performance Guarantee. Knowing which is which, and which one you’re more likely to need, is key to your long-term peace of mind.
The Product Warranty is the most straightforward and, arguably, the more important of the two. It covers manufacturing defects in the panel itself. If the panel physically fails—due to a faulty junction box, frame delamination, or internal cell-level defect—this is the warranty you’ll claim. These warranties typically last 10 to 25 years and result in a replacement panel being provided by the manufacturer. This is the cover that protects you from a component simply breaking.
The Performance Guarantee (or linear performance warranty) is the one that promises the panel will still produce a certain percentage of its original power after a set number of years, for instance, 85% at year 25. This sounds great, but claiming on it is notoriously difficult and expensive. To prove a panel has degraded beyond its guaranteed threshold, you need a certified engineer to de-install the panel and have it tested under lab conditions (Standard Test Conditions – STC). This process can cost hundreds of pounds per panel, with no guarantee that the manufacturer will agree with the findings. It’s a safety net, but one with a very high bar to access.
Here is a breakdown of the typical warranties you’ll have for a UK system:
| Warranty Type | Coverage Period | What’s Covered | Typical Claim Process |
|---|---|---|---|
| Product Warranty | 10-25 years | Manufacturing defects, premature failure | Contact manufacturer’s UK office with MCS certificate |
| Performance Guarantee | 25-30 years | Power output (typically 85% at year 10, 80% at year 25) | G99-certified engineer test required (£300-500) |
| Installation Warranty | 2-10 years | Workmanship, mounting system | Contact installer (use HIES/IWA if installer ceased trading) |
Some technical experts in the industry estimate that a solar & battery system will need three maintenance call-outs across a 20-year period – one for the panels, one for the battery, and one for the inverter
– Sunsave Energy Industry Report, Solar Panel Maintenance Guide 2026
For most owners, a strong Product Warranty from a reputable manufacturer with a UK presence is far more valuable than an ambitious Performance Guarantee. It’s the physical failure of a component, not its slow, marginal degradation, that is the more likely cause for a call-out.
The Inverter Clipping Debate: Is It Bad to Undersize Your Inverter?
You may have noticed that the total peak power of your solar panels (e.g., 4.2kWp) is higher than the maximum output of your inverter (e.g., 3.68kW). This isn’t a mistake. It’s a deliberate design choice known as “undersizing” the inverter, and it’s a common and often beneficial practice in the UK. However, it leads to a phenomenon called “clipping,” where any power generated by the panels above the inverter’s maximum capacity is simply lost, or “clipped off.”
On paper, this sounds like wasting free energy. So why do installers do it? The answer is a combination of regulation and real-world efficiency. Firstly, in the UK, inverters up to 3.68kW per phase can be installed under a simplified G98 notification process. Going above this limit requires a more complex and costly G99 application to the local Distribution Network Operator (DNO). Opting for a 3.68kW inverter saves significant admin time and cost during installation, a saving often passed on to the customer.
Secondly, and more importantly for long-term performance, inverters have an efficiency curve. They work most efficiently when they are operating closer to their maximum capacity. A larger inverter running at a fraction of its capacity on a cloudy day can be less efficient than a smaller inverter running at a higher percentage of its capacity. Given the UK’s predominantly overcast or partially sunny conditions, the system spends far more time in the “low to medium” generation zone than at its absolute peak.
Inverter Undersizing Economics in UK Climate
An analysis of a 4.2kWp panel array connected to a 3.68kW inverter in a typical UK location demonstrates this trade-off perfectly. The system experiences peak clipping for only 50-100 hours per year, primarily during midday on the sunniest summer days. For the other several thousand hours of daylight, the undersized inverter operates in a more efficient part of its power curve. The small amount of energy lost to clipping is more than offset by the efficiency gains during the vast majority of the year, making this configuration economically optimal for the UK climate.
So, if you see your generation graph flat-lining at 3.68kW for an hour or two on a bright June day, don’t panic. This is inverter clipping in action, and it’s a sign your system was likely designed intelligently for the UK’s specific weather patterns, prioritising year-round performance over capturing every last watt on a handful of perfect days.
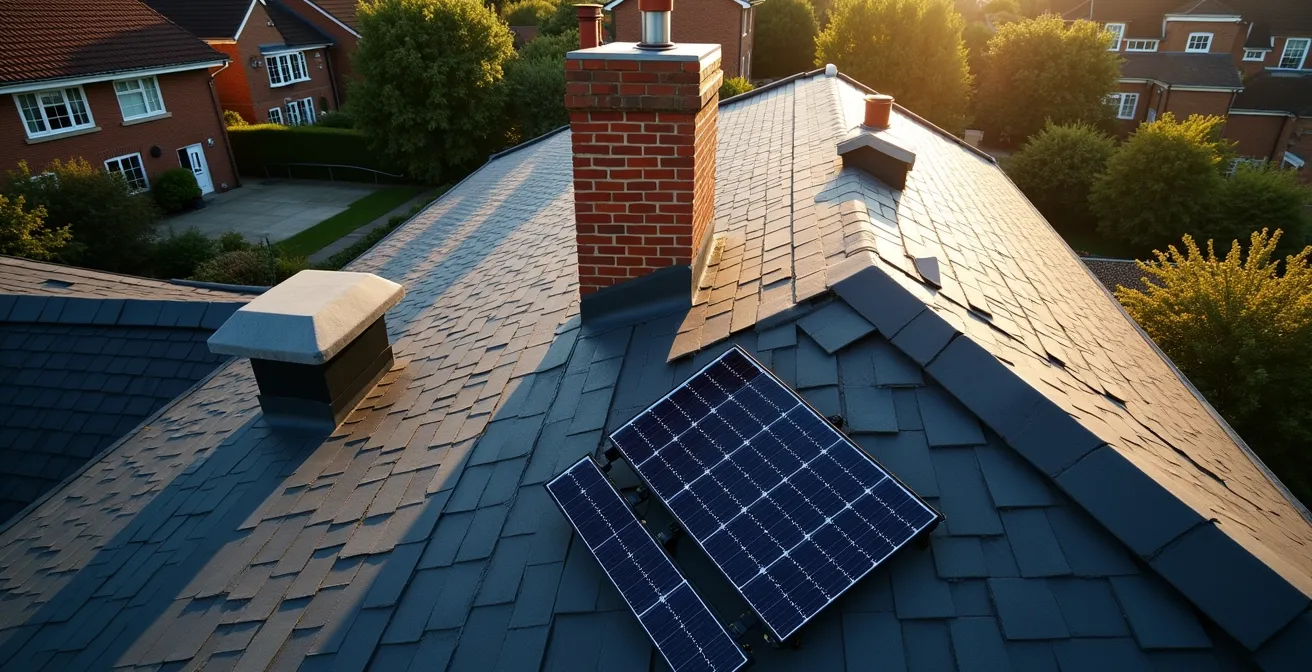
How Do Bypass Diodes Save Your Generation When a Chimney Casts a Shadow?
Shading is a solar panel’s enemy. Even a small shadow from a chimney, a neighbouring tree, or a TV aerial can have a disproportionately large impact on your system’s output. In a standard string of panels, all connected in series, a single shaded panel acts like a bottleneck, reducing the current for the entire string and potentially slashing your generation by a significant amount. To combat this, modern solar panels are fitted with an ingenious and crucial component: bypass diodes.
Think of a bypass diode as a small diversionary route for electricity. Each panel is typically divided into three sections, and each section has its own bypass diode. If one of these sections becomes shaded, its voltage drops, and it starts to resist the flow of electricity from the other, sunlit sections. Instead of forcing the current through this high-resistance bottleneck, the bypass diode activates, creating an alternative path for the electricity to “bypass” the underperforming section.
The result is that you only lose the output of the small shaded section of the panel, not the entire panel or, worse, the whole string of panels. This is why, when you see a chimney shadow moving across your roof, your power output doesn’t suddenly plummet to zero; it just dips slightly as the diodes do their job. For most UK homes with predictable, partial shading, the bypass diodes built into standard panels are more than sufficient to manage the issue effectively.
However, for more complex roofs with multiple shading sources or where a significant portion of the array is shaded for long periods, you might consider power optimisers or microinverters. These are module-level power electronics (MLPEs) that manage the output of each panel individually, ensuring that one shaded panel has absolutely no impact on any others. While more expensive, they can be a worthwhile investment in challenging shade situations.
Your Shading Solution Checklist
- Assess the source: Is the shadow from a chimney (predictable path) or trees (seasonal variation, growth)?
- Measure the coverage: Is less than 10% of the entire array covered at any one time? If so, standard bypass diodes are likely sufficient.
- Calculate shadow duration: Is the shadow present for under two hours per day on average? If yes, bypass diodes should be adequate.
- Consider roof complexity: Are there multiple, unavoidable obstructions? This might point towards a need for MLPEs like optimisers.
- Evaluate the cost-benefit: Power optimisers can add £1000-£1500 to a system cost but can increase yield by 15-25% in heavy shading. Does your situation justify the expense?
The Bird Proofing Error That Costs £500 to Fix Later
It’s an issue that most people don’t consider until it’s too late: pigeons and other birds nesting under your solar panels. The gap between the panels and your roof tiles provides a sheltered, safe-seeming spot for birds to build their nests. Unfortunately, this seemingly harmless cohabitation can lead to serious and expensive problems for your solar installation.
The primary issue is damage to the equipment. Birds can dislodge or chew through the sensitive wiring that runs underneath the panels, leading to short circuits, system faults, or a complete loss of generation from an entire string of panels. Their nesting materials—twigs, droppings, and other debris—can accumulate, creating fire hazards and blocking airflow, which, as we’ve learned, can cause panels to overheat and lose efficiency. The corrosive nature of bird droppings can also damage the backsheet of the panels and the mounting equipment over time.
Fixing this damage is not cheap. It often requires an engineer to erect scaffolding, remove the panels, repair or replace the damaged wiring, and then reinstall everything. This can easily run to £500 or more, far exceeding the initial cost of preventative measures. This is why many experienced installers now recommend bird proofing as a standard part of any installation, especially in urban or suburban areas.
From start to finish I found the whole team at Deege first rate. Explained everything clearly and installed solar panels, batteries and car charging points neatly and quickly. The bird proofing installation was essential – pigeons had been nesting under the panels causing significant fouling and cable damage.
– Customer Testimonial, Deege Solar
The solution is a specially designed mesh or spike system that is fitted around the perimeter of the solar array, blocking access for birds without damaging the panels or the roof. It’s a relatively simple, low-cost addition that can prevent a much larger headache and expense down the line. Data from UK maintenance providers shows the clear economic benefit, with the average cost for preventative bird proofing being significantly less than the cost of electrical repairs caused by nesting birds.
The Garage vs Loft Debate: Where Is the Safest Place to Install Batteries?
With the rise of smart export tariffs and the desire to maximise self-consumption, adding a battery to a solar system has become increasingly popular. However, the decision of where to physically locate the battery is a critical one, involving a trade-off between performance, safety, and cost. In the UK, the two most common indoor locations are the garage and the loft, each with distinct pros and cons.
The garage is often the preferred location for installers. It’s typically easy to access, has solid concrete floors, and is well-ventilated. Most importantly, it tends to maintain a more stable, moderate temperature throughout the year compared to a loft. Lithium-ion batteries have an optimal operating temperature range, and keeping them out of extreme heat or cold helps prolong their lifespan and maintain their performance. Fire safety regulations are also easier to meet in a garage, often just requiring sufficient clearance from flammable materials and vehicles.
The loft, on the other hand, presents more challenges. While it might seem convenient to place the battery near the solar panels and inverter, lofts in the UK are uninsulated spaces that experience significant temperature swings—baking in the summer and freezing in the winter. This thermal stress is not ideal for battery health. Furthermore, installing a heavy battery system in a loft requires ensuring the ceiling joists can support the weight. Crucially, fire safety regulations (Part B of the UK Building Regulations) are much stricter for loft installations, requiring fire-resistant boarding and ensuring clear escape routes are maintained, which can add significant cost and complexity to the installation.
This comparative table highlights the key considerations for an installation in England:
| Location | Temperature Range | Fire Safety Requirements | Installation Cost | Insurance Impact |
|---|---|---|---|---|
| Garage | -5°C to 25°C (unheated) | 2m clearance from vehicles | £200-400 | Usually accepted |
| Loft | -2°C to 40°C (seasonal extremes) | Fire-resistant boarding, Part B compliance | £400-800 | May require notification |
| External Enclosure | -10°C to 30°C (weatherproof) | IP65 rating minimum | £600-1200 | Preferred by insurers |
Ultimately, while a loft installation is sometimes possible, the garage is almost always the safer, more stable, and more cost-effective location for a home battery system in the UK. Always consult with an MCS-certified installer to assess the best and safest location for your specific property.
Key Takeaways
- Don’t panic about summer heat dips; it’s normal physics. Understand your panel’s temperature coefficient.
- Clean lichen with patience and soft tools only. Abrasives cause permanent, costly damage.
- Focus on your Product Warranty for physical failures; the Performance Guarantee is hard to claim.
- Inverter clipping is a feature, not a bug, in most UK systems, optimising for year-round cloudy conditions.
- Preventative bird proofing is a cheap investment compared to the £500+ cost of repairing chewed cables.
Are Solar Panels Still Worth It in the UK Without the Feed-in Tariff?
For years, the Feed-in Tariff (FiT) was a primary driver for solar adoption in the UK, offering generous payments for every kilowatt-hour generated. Since FiT closed to new applicants in 2019, many potential and existing owners wonder if the economics of solar still stack up. The answer is a resounding yes, but the financial model has fundamentally changed. The focus has shifted from generating for export to maximising self-consumption.
The new mechanism is the Smart Export Guarantee (SEG). Under this scheme, energy suppliers are required to pay households for any surplus electricity they export to the grid. However, the rates are far less generous than the old FiT rates and vary wildly between suppliers. For example, analysis shows some agile tariffs pay over 25p/kWh at peak times, while other suppliers offer a flat rate as low as 3p/kWh. This makes choosing the right energy tariff a critical part of the financial equation.
However, the real value of solar today comes from the savings on your bill. Every kilowatt-hour of solar energy you use in your home is a kilowatt-hour you don’t have to buy from the grid, at today’s high electricity prices of 25p/kWh or more. This “avoided cost” is where the biggest financial benefit lies. This is also why pairing solar panels with a battery has become so popular. A battery allows you to store the surplus energy you generate during the day and use it in the evening, pushing your self-consumption from around 30% to over 70% and drastically reducing your reliance on the grid.
Post-FiT Solar Economics with Battery Storage
A 2024 analysis by Which? illustrates the powerful modern economics of solar. A typical 4kWp solar system paired with a 5kWh battery in the UK can generate an annual benefit of around £1,525. The vast majority of this (£1,254) comes from bill savings through self-consumption, with only a smaller portion (£271) coming from SEG export payments. With typical installation costs for such a system now between £7,000 and £9,000, the payback period is often just 5 to 7 years. This demonstrates that even without the old subsidies, solar PV remains one of the best home improvements for reducing bills and securing a strong return on investment.
Solar panels in the post-FiT era are not just a way to earn a small income; they are a powerful tool for energy independence and long-term financial savings. All the maintenance and optimisation techniques discussed in this guide are designed to protect that investment and ensure your system delivers maximum value for its entire lifespan.
Assess your system’s performance now using these technical checkpoints to ensure you maximise your return on investment for years to come.
Frequently Asked Questions on Solar Panel Maintenance
Do I need to inform my UK home insurer about battery installation?
Yes, you must inform your insurer about any battery installation. Failure to do so could invalidate your policy in case of fire or damage claims.
What are UK Building Regulations Part B requirements for battery storage?
Part B requires adequate ventilation, fire-resistant materials within 1m of the battery, and clear escape routes. MCS standards add specific clearance requirements.
Which battery chemistry is best for UK temperature extremes?
LFP (Lithium Iron Phosphate) batteries tolerate UK temperature ranges better than NMC, operating efficiently from -10°C to 50°C.