Contrary to modern building wisdom, sealing a Victorian house airtight is the fastest way to create damp. The key isn’t blocking airflow but managing moisture with ‘breathable’ materials that work in harmony with the original structure. This approach prevents costly damage from trapped water and creates a healthy, warm home that performs as it was designed to.
Living in a Victorian terrace offers unparalleled character, but it often comes with a significant drawback: the winter cold. The desire to create a warm, energy-efficient home is understandable, yet many owners find themselves paralysed by fear. Horror stories of insulation projects gone wrong, leading to rampant mould, rotting timbers, and catastrophic damp issues are all too common. The conventional wisdom of modern construction—seal everything tight, use impermeable membranes, and inject foam into every cavity—is precisely what spells disaster for a period property.
The fundamental misunderstanding lies in how these old buildings were designed to function. Unlike modern homes that rely on plastic vapour barriers, Victorian houses were built to breathe. Their solid walls, lime-based mortars, and timber elements are all part of a dynamic system that actively manages moisture. Applying modern, non-breathable materials is like forcing someone to run a marathon while wearing a plastic raincoat; the building suffocates in its own condensation.
But what if the solution wasn’t to fight the building’s nature, but to work with it? This guide moves beyond the generic advice. It will not tell you to simply block draughts or wrap your home in plastic. Instead, we will explore the principles of sympathetic restoration and vapour permeability. We’ll delve into why modern cement destroys historic brick, how to insulate correctly without trapping moisture, and why restoring original features is often superior to replacing them. This is not just about adding insulation; it’s about making your home thermally efficient without compromising its structural integrity or historic soul.
This article provides a detailed roadmap for making informed decisions. Below is a summary of the key areas we will cover, guiding you through the technical challenges and sustainable solutions for your period home.
Summary: A Guide to Safely Insulating Your Victorian Home
- Why Do Modern Cements Damage Victorian Bricks Within 5 Years?
- How to Seal Draughty Floorboards in a Victorian Hallway Without Lifting Them?
- Refurbish or Replace: What Is the Best Option for Rotten Sash Windows?
- The Internal Insulation Error That Rots Joist Ends Secretly
- How to Stop Mould Growing in a Newly Insulated Period Home?
- How Does Lime “Manage” Moisture Instead of Blocking It?
- The Cement Render Mistake That Traps Moisture in Historic Stone
- Internal vs External Wall Insulation: Which Is Right for Your Brick Property?
Why Do Modern Cements Damage Victorian Bricks Within 5 Years?
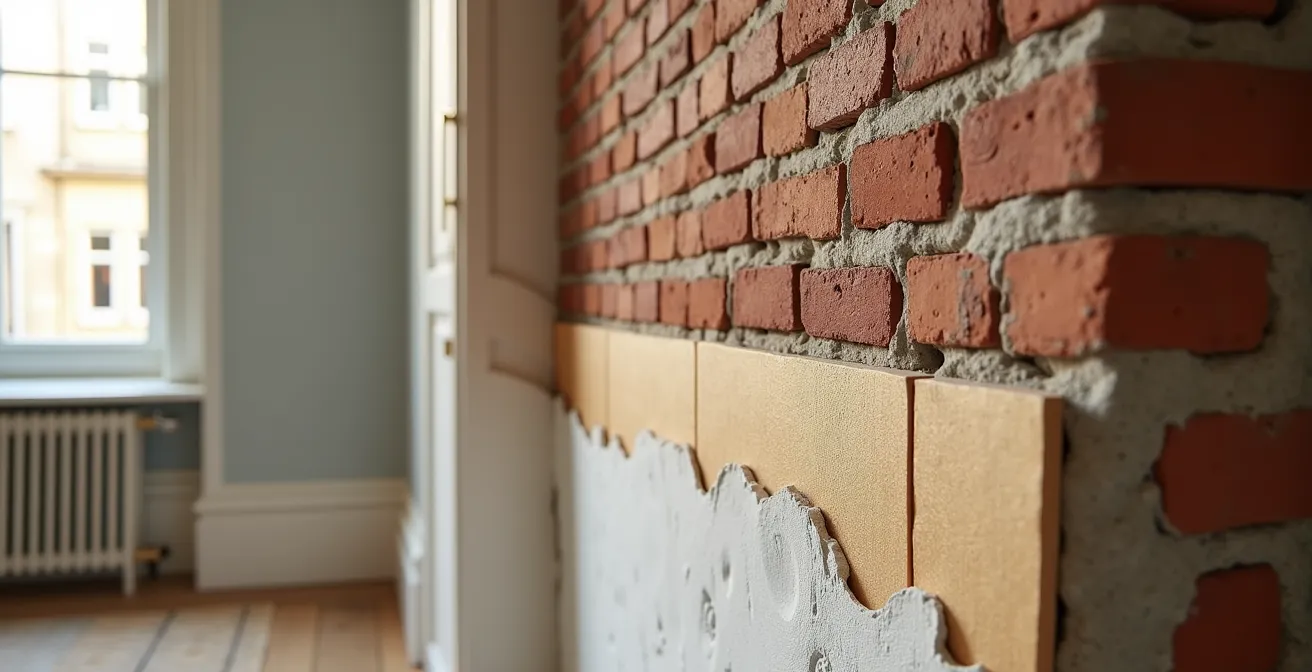
One of the most common and destructive mistakes made in Victorian properties is re-pointing old brickwork with modern cement mortar. It seems logical—cement is hard, durable, and waterproof. However, these very properties are what make it catastrophic for soft, historic bricks. Victorian houses were built with a soft, porous lime mortar that was intentionally weaker than the bricks themselves. As the conservation expert at Victorian House UK notes, this system works because “the pointing of the wall acts as the lung of the building and clogging it with dense cement suffocates the building.”
The pointing of the wall acts as the lung of the building and clogging it with dense cement suffocates the building.
– Victorian House UK, Victorian Lime mortars, renders and plasters guide
Lime mortar is vapour-permeable, meaning it allows moisture trapped within the solid wall to evaporate out through the mortar joints. Cement is the opposite; it’s impermeable and traps moisture inside the wall. With its escape route blocked, this moisture is forced to exit through the face of the brick. In an English climate, this leads to a destructive cycle of freezing and thawing, causing the brick face to crumble and flake away—a process known as spalling. The mortar remains pristine, but the bricks around it are destroyed. Correcting this mistake is incredibly expensive; analysis on MyBuilder suggests that lime mortar pointing is significantly more expensive than sand & cement but prevents costly brick damage that can exceed £10,000 to rectify on a single facade.
Ultimately, using cement on a Victorian wall is a ticking time bomb. It prioritises hardness over flexibility and breathability, leading to irreversible damage that compromises both the building’s appearance and its structural health.
How to Seal Draughty Floorboards in a Victorian Hallway Without Lifting Them?
The characteristic gaps between original Victorian floorboards are a notorious source of cold draughts, contributing significantly to a home’s heat loss. With studies showing that draughty homes make up 14% of UK emissions, tackling this issue is both an environmental and a comfort priority. While the most thorough solution is lifting the boards to install underfloor insulation, this is a disruptive and costly process. Fortunately, effective methods exist to seal these gaps from above.
Traditional methods involved stuffing the gaps with a mixture of papier-mâché or a mix of sawdust and glue. Today, more sophisticated solutions are available. Flexible, wedge-shaped fillers made from polymer or resin (such as ‘Stop-Draught’) can be pushed into the gaps, moving with the boards as they naturally expand and contract with seasonal humidity changes. For a simpler, low-cost approach, applying a colour-matched sealant from a tube is effective, though it may be less durable over the long term. A thermal underlay and a heavy rug can also make a significant difference, acting as a surface-level barrier.
A recent innovation offers a high-tech solution without any disruption: robotic underfloor insulation. Companies like Q-Bot use a small, remote-controlled robot to travel into the sub-floor void and spray a layer of insulation directly onto the underside of the floorboards. This method provides excellent coverage and eliminates draughts without the need to lift a single board, though the upfront cost is higher.
The following table, adapted from data seen in publications like Grand Designs Magazine, compares these modern and traditional approaches to help you decide on the best fit for your budget and needs.
| Method | Installation | Cost | Effectiveness |
|---|---|---|---|
| Robot insulation | No lifting required | Higher upfront | Excellent coverage |
| Traditional underfloor | Floorboards lifted | Moderate | Complete insulation |
| Thermal underlay & rug | Surface only | Low cost | Good first step |
Choosing the right method depends on your budget, tolerance for disruption, and long-term goals. Even the simplest measures can make a noticeable improvement to the comfort of your Victorian hallway, reducing draughts and lowering your heating bills.
Refurbish or Replace: What Is the Best Option for Rotten Sash Windows?
Original sash windows are a defining feature of Victorian architecture, but when they become rotten and draughty, the temptation to replace them with modern uPVC units is strong. However, from both a conservation and a financial standpoint, refurbishment is almost always the superior option. The timber used in Victorian sashes is typically slow-grown, old-growth wood of a quality that is virtually unobtainable today. It is far more durable and resistant to rot than modern, fast-grown softwood.
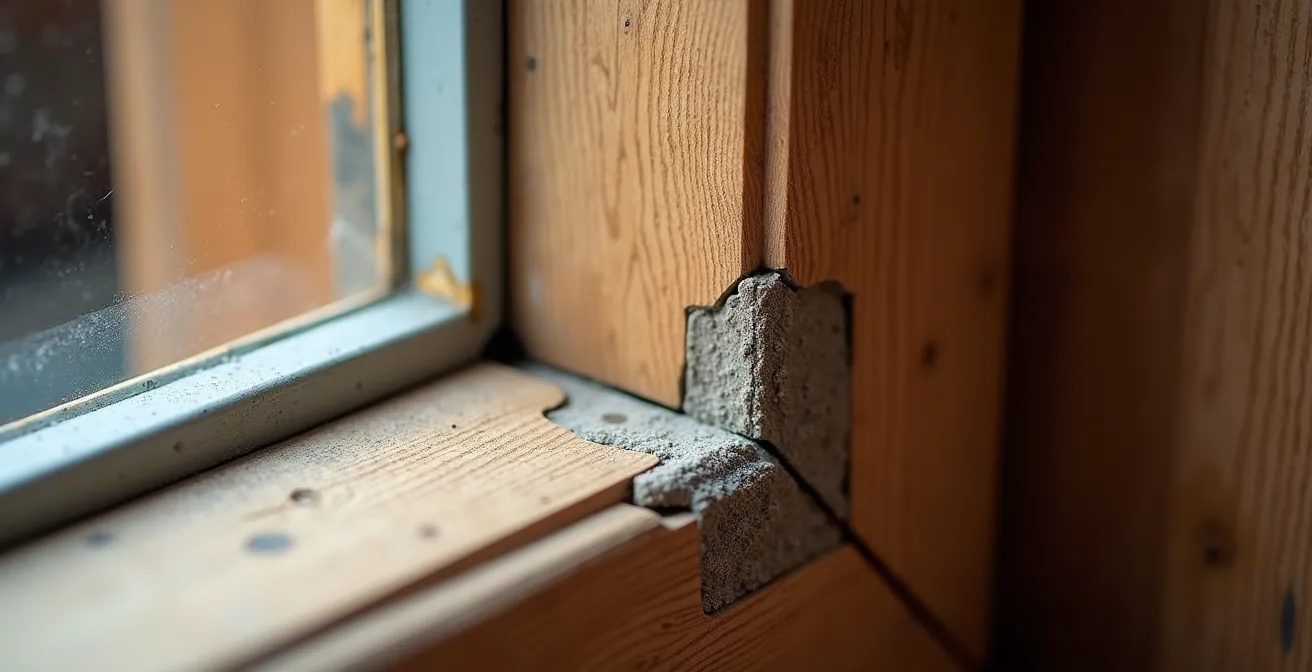
A specialist joiner can repair rotten sections by splicing in new, seasoned hardwood, replacing sash cords, and installing discreet draught-proofing strips into the frame. This process retains the original character and charm of the window while dramatically improving its performance. Furthermore, the cost is significantly lower. According to Checkatrade, a full sash window refurbishment costs around £770, compared to upwards of £1,450 for a new timber sash replacement. UPVC is cheaper still, but it devalues a period property and has a much shorter lifespan, often requiring replacement within 20-30 years.
Even the argument for thermal performance can be addressed through refurbishment. It’s possible to upgrade original sashes by replacing the single panes with slim-profile double-glazing units that fit within the original delicate glazing bars. This maintains the authentic appearance while providing modern levels of insulation. An analysis by Colin’s Sash Windows suggests that such upgrades can lead to annual energy savings of £75-£200 and enhance the property’s value. When you consider the embodied carbon of manufacturing new windows versus repairing old ones, refurbishment is also the far more sustainable choice.
Unless a window is damaged beyond repair, choosing to restore and upgrade your original sashes is a victory for craftsmanship, sustainability, and your wallet. It preserves a key piece of your home’s history while making it fit for the 21st century.
The Internal Insulation Error That Rots Joist Ends Secretly
Internal Wall Insulation (IWI) is often the only viable option for insulating a Victorian terrace, especially in conservation areas where external changes are forbidden. However, if detailed incorrectly, it can create a hidden damp problem that is far worse than the original heat loss. The critical error occurs at the junction where internal floors meet the external wall. These junctions create ‘thermal bridges’—uninsulated spots through which heat escapes. Research from conservation architects like Studio CMA shows that heat can leak through uninsulated floor voids at wall junctions, accounting for up to 30% of total wall heat loss.
The danger arises when a builder installs a standard rigid insulation board (like PIR or phenolic foam) directly against the internal face of the brick wall. This pushes the ‘dew point’—the point at which warm, moist internal air cools and condenses into water—from the room’s surface into the wall structure itself. When this condensation point lands on the cold ends of the timber floor joists embedded in the brickwork, it creates the perfect conditions for rot. Because this interstitial condensation is happening out of sight, the joist ends can decay for years before any signs become visible, potentially leading to catastrophic structural failure.
The correct approach is to use a breathable insulation system. Materials like wood fibre board, cork, or hempcrete manage moisture rather than blocking it. Crucially, the insulation must be detailed correctly around the joists. This often involves cutting the insulation to fit tightly around each joist end and using a special vapour-permeable membrane to wrap the timber, allowing it to breathe while protecting it from direct contact with the cold masonry. This is skilled work that requires a deep understanding of building physics. Before hiring a builder, it is vital to ensure they understand these principles.
Your Pre-Insulation Checklist: Key Questions for Your Builder
- How will you detail the insulation around joist ends to prevent cold bridging?
- Will you maintain a ventilated cavity between the insulation and brick wall?
- How many air bricks will be added to satisfy building regulations?
- What vapour-permeable membrane will you use around timber elements?
- How will you ensure the wall continues to breathe after insulation?
Getting internal insulation right is not about the thickness of the material, but the intelligence of the detailing. A breathable system, installed by a knowledgeable contractor, will keep your house warm without trapping the moisture that leads to decay.
How to Stop Mould Growing in a Newly Insulated Period Home?
A common and distressing side effect of a poorly executed insulation project is the sudden appearance of mould. Homeowners insulate to create a warm, cosy environment, only to find black spots appearing in corners, behind furniture, and around windows. This occurs because while the insulation has made the house warmer, it has also made it more airtight, trapping the moisture generated by everyday life—cooking, breathing, showering—inside.
Victorian houses were inherently draughty, and this constant, uncontrolled air exchange, while inefficient, was very effective at removing moisture. When you seal up the draughts without providing a new, controlled path for ventilation, indoor humidity levels rise dramatically. When this humid air comes into contact with a cold surface (like a windowpane or an uninsulated corner of a wall), it condenses, creating the damp conditions mould needs to thrive. Therefore, the mantra for a healthy, insulated period home must be: insulate tight, ventilate right.
Effective ventilation is not about opening a window for ten minutes; it’s about providing consistent, background air exchange. In humid rooms like kitchens and bathrooms, powerful extractor fans are non-negotiable. For the rest of the house, options include installing trickle vents in window frames or, for a more comprehensive solution, a Positive Input Ventilation (PIV) system. A PIV unit, typically installed in the loft, gently introduces fresh, filtered air into the home, creating positive pressure that pushes out stale, moist air through natural leakage points. Monitoring humidity with inexpensive digital hygrometers can help you maintain a healthy relative humidity of 40-60%, making it difficult for mould to establish itself.
Ultimately, ventilation should not be an afterthought; it must be an integral part of any insulation strategy for a period home. It is the essential counter-measure that ensures your warm and efficient house also remains healthy and dry.
How Does Lime ‘Manage’ Moisture Instead of Blocking It?
The term ‘breathability’ is central to understanding traditional building materials, and lime is the quintessential breathable material. Unlike modern cements, which form a hard, impermeable barrier, lime-based mortars, plasters, and renders have a different relationship with water. They are both vapour-permeable and hygroscopic, and this combination is what allows them to actively ‘manage’ moisture within a wall.
Vapour permeability means that lime has a microporous structure that allows water vapour (a gas) to pass through it freely. This is the ‘breathing’ action. It provides an escape route for any moisture that gets into the solid wall, whether from driving rain on the outside or condensation from within. Cement blocks this path, trapping water and leading to the damp and decay problems discussed earlier. The ability of a wall to dry out is just as important as its ability to resist water ingress.
The second property, being hygroscopic, means lime can absorb and store liquid water from the surrounding environment when humidity is high, and then release it back into the air as vapour when humidity drops. It acts like a natural sponge or buffer, regulating the humidity within the wall and the room. This is why a lime-plastered room often feels more comfortable—the walls themselves help to balance the moisture in the air. This is a key reason why modern ‘insulating plasters’ based on lime, such as Diathonite, are so effective. As a case study from Sustainable St Albans shows, such a plaster can be applied at varying thicknesses to insulate complex shapes like Victorian bay windows, providing both thermal performance and crucial moisture management.
By working with the natural physics of moisture movement, lime-based materials protect the fabric of a building. They don’t fight water; they guide it, ensuring the structure remains dry, healthy, and durable for centuries.
The Cement Render Mistake That Traps Moisture in Historic Stone
Just as cement pointing is disastrous for brickwork, covering a Victorian stone or brick wall with a modern cement render is one of the most damaging things that can be done to a period property. Often applied to hide poor-quality masonry or to give a ‘smooth’ modern finish, cement render acts like a non-breathable plastic sheet wrapped around the building. While it may appear waterproof initially, problems are inevitable.
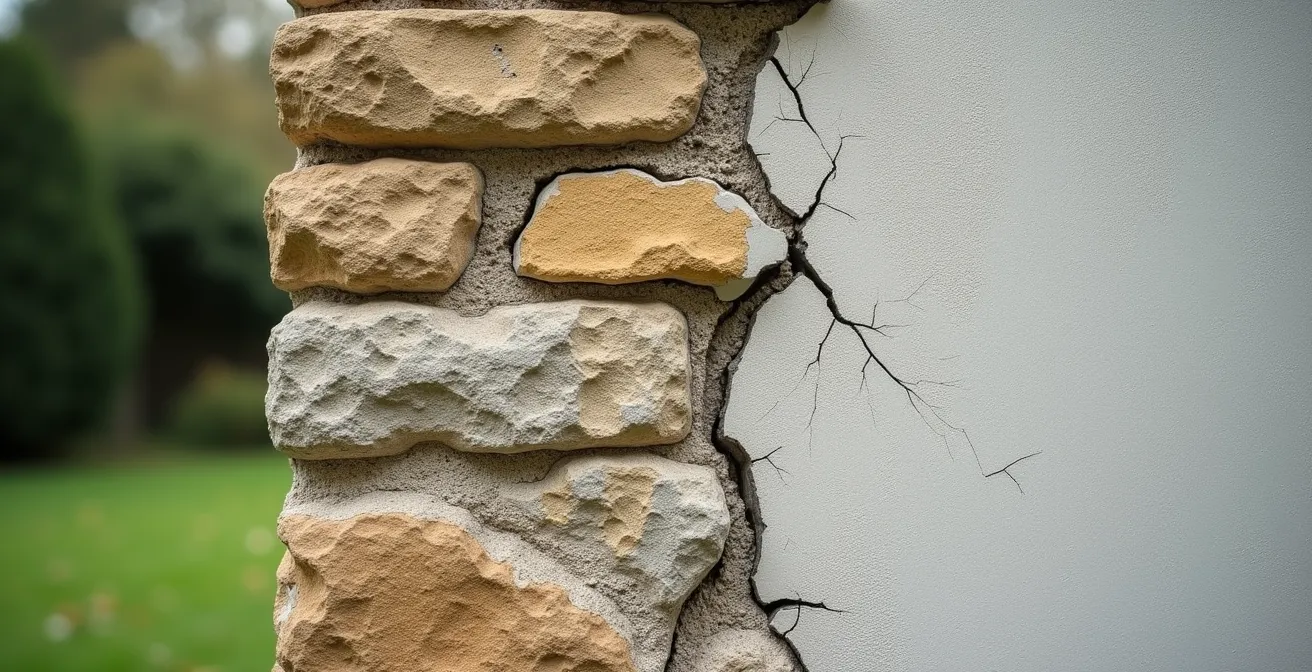
Cement render is brittle and inflexible. Due to the natural microscopic movements of a building and thermal expansion and contraction, the render invariably develops a network of fine, map-like cracks. Rainwater penetrates these cracks and gets trapped between the render and the wall. Because the render is not vapour-permeable, this trapped water cannot evaporate. The wall behind becomes saturated, leading to severe damp problems internally and causing the stone or brickwork to decay out of sight. You can often see the evidence at the base of a rendered wall, where a ‘tide mark’ of damp appears as the trapped water tries to escape.
The correct approach is to use a traditional lime render. Like lime mortar, lime render is flexible and breathable. It can accommodate the natural movement of the building without cracking, and any moisture that gets into the wall can easily evaporate back out through the render. This keeps the underlying wall structure dry and healthy. Identifying the type of render on a property is a key diagnostic step. Cement render is typically grey, very hard, and has a smooth, flat finish, whereas lime render is usually off-white, softer to the touch, and has a more characterful, less uniform surface.
Removing cement render is a laborious and expensive task, but it is often essential to save the wall behind it. It’s a powerful lesson that in period buildings, materials that block moisture will always cause more problems than they solve.
Key Takeaways
- Victorian houses must ‘breathe’; using modern impermeable materials like cement or spray foam traps moisture and causes damp and rot.
- The goal is to manage moisture with vapour-permeable materials (like lime and wood fibre), not block it with plastic barriers.
- Restoring original features like sash windows is often cheaper, more sustainable, and better for property value than replacing them with uPVC.
Internal vs External Wall Insulation: Which Is Right for Your Brick Property?
Once you’ve committed to insulating your solid brick walls, the big decision is whether to apply it internally (Internal Wall Insulation – IWI) or externally (External Wall Insulation – EWI). Both have significant implications for cost, disruption, and aesthetics, and the right choice depends heavily on your specific property and location.
External Wall Insulation (EWI) involves fixing insulation boards to the outside of the house and covering them with a protective render. From a building physics perspective, this is the superior method. It wraps the entire building in a continuous thermal blanket, eliminating thermal bridges and keeping the building’s structural mass warm and dry. However, it completely changes the building’s external appearance. For this reason, EWI is almost never granted planning permission in conservation areas or on listed buildings, making it a non-starter for most urban Victorian terraces. It is also more expensive, costing between £70-£120 per m².
Internal Wall Insulation (IWI) is the more common approach for period properties. It involves adding insulation to the inside face of the external walls. As detailed earlier, this must be done with breathable materials (like wood fibre or cork boards) to avoid interstitial condensation. The main drawbacks of IWI are the loss of internal floor space—typically 50-100mm per wall—and the disruption, as it requires removing skirting boards, cornices, and electrical fittings. However, it preserves the building’s external appearance, making it the only option for many. According to Good Homes Magazine, IWI on an average three-bed semi costs around £8,500, with potential annual savings of £475-£600. The risk of thermal bridging at floor and ceiling junctions is higher with IWI and requires careful, expert detailing.
This decision matrix, based on guidance from conservation-focused firms like Studio CMA, helps clarify the trade-offs.
| Factor | Internal (IWI) | External (EWI) |
|---|---|---|
| Conservation Area/Listed | Usually only option | Often not permitted |
| Space Loss | 50-100mm per wall | No internal loss |
| Cost per m² | £45-60 | £70-120 |
| Thermal Bridge Risk | Higher at junctions | Continuous coverage |
| Original Features | May need removal | Preserved internally |
For most owners of Victorian terraces in England, a well-detailed, breathable IWI system will be the most appropriate path. It represents a compromise, but one that can deliver significant gains in comfort and efficiency while respecting the building’s heritage.
Frequently Asked Questions on Insulating Victorian Properties
What ventilation is needed?
To prevent condensation and mould in a newly insulated home, controlled ventilation is essential. This includes powerful extractor fans in kitchens and bathrooms, and background ventilation in other rooms, which can be achieved through trickle vents in windows or a whole-house solution like a Positive Input Ventilation (PIV) system. The goal is to consistently remove moisture-laden air.
How do I monitor humidity levels?
You can easily monitor indoor humidity using inexpensive digital hygrometers placed in key rooms. Aim to keep the relative humidity between 40% and 60%. If levels are consistently higher, it’s a sign that your ventilation strategy needs to be improved to prevent the risk of condensation and mould growth.