
Contrary to common UK horror stories, an air source heat pump’s success in winter isn’t a matter of luck; it’s the predictable result of proper system design.
- Cold weather performance down to -20°C is standard for quality units, well below typical UK temperatures.
- Noise issues are entirely preventable by following mandatory MCS 020 acoustic assessment regulations during installation.
- Running costs can be significantly lower than gas when the system is correctly sized and paired with a smart electricity tariff.
Recommendation: Prioritise a ‘fabric-first’ approach to reduce your home’s heat loss, then engage an MCS-certified installer who provides a full system design, not just a quote for a box.
The promise of low-carbon heating is compelling, but for many UK homeowners, it’s overshadowed by doubt. You’ve likely heard the stories: heat pumps that can’t cope with a cold snap, astronomical electricity bills, and the constant, irritating hum that drives neighbours to despair. These concerns are valid and stem from a period of poorly executed early installations. The conversation often circles around generic advice like “you just need more insulation,” which, while true, fails to address the specific, technical anxieties of those living in Britain’s varied housing stock.
But what if these failures aren’t an indictment of the technology itself, but of its application? The key to unlocking a heat pump’s efficiency and reliability in the UK isn’t found in the unit alone, but in understanding it as part of a complete heating *system*. The secret isn’t just about insulating your loft; it’s about flow temperatures, radiator sizing, hydraulic design, and mandatory acoustic regulations that installers must follow. As experts accustomed to designing systems for harsh Nordic climates, we know that a UK winter is a perfectly manageable challenge.
This article moves beyond the myths. We will systematically deconstruct each common fear—from running costs and noise to performance in freezing weather and compatibility with old pipework. By focusing on the principles of correct system design and the specific UK regulations in place, we will provide the factual, reassuring answers you need to determine if a heat pump is the right choice for your home.
To navigate these technical points with clarity, this guide breaks down the most pressing questions sceptical homeowners have. Explore the topics that matter most to you or follow along to build a complete picture of how heat pumps truly perform in the UK.
Contents: Your Guide to Heat Pump Realities in the UK
- Why Does a COP of 3.5 Matter for Your Wallet?
- Where to Position Your Heat Pump to Avoid Annoying the Neighbours?
- Monobloc or Split Unit: Which Is Safer Against Freezing Risks?
- The Microbore Pipe Nightmare: Can You Install a Heat Pump on 8mm Pipes?
- Do You Really Need to Replace Every Radiator for a Heat Pump?
- Why Does a 100mm Air Gap Kill Traffic Noise Better Than 20mm?
- Fabric First or Heat Pump First: Which Sequence Is Safer?
- Which Low-Carbon Heating System Suits a 1990s Detached House Best?
Why Does a COP of 3.5 Matter for Your Wallet?
The single most important metric for understanding a heat pump’s running cost is its Coefficient of Performance, or COP. A COP of 3.5 means that for every 1 kilowatt-hour (kWh) of electricity the pump consumes, it generates 3.5 kWh of heat for your home. This isn’t magic; it’s simply moving existing heat from the outside air to the inside. A modern gas boiler, by contrast, is typically 85-92% efficient, meaning for every 1 kWh of gas burned, you get less than 1 kWh of usable heat. The annual average of this metric, known as SCOP, is what truly defines your yearly costs, and a heat pump with SCOP 3.5 delivers 3.5 kWh of heat for every unit of electricity used over a year.
This efficiency ratio is the key to whether a heat pump costs more or less to run than your existing gas boiler. While electricity per kWh is more expensive than gas in the UK, the 350% efficiency of the heat pump often closes this gap. The real savings, however, are unlocked when this efficiency is combined with smart electricity tariffs. A documented case study of a UK homeowner with a 5kW heat pump showed that by using an Octopus Go Faster tariff, they could run the unit primarily during a 5-hour overnight cheap rate. This dramatically lowered their average unit cost for electricity, leading to significant savings compared to their old gas system.
Understanding this relationship between efficiency and tariff is crucial. A heat pump on a standard flat-rate tariff may have running costs comparable to gas, but when optimised, it becomes significantly cheaper.
The table below, based on 2024 UK energy rates, illustrates this point clearly. It compares the cost to generate 10 kWh of heat—a useful benchmark for a cold hour—across different systems. As the comparative analysis shows, a heat pump on a smart tariff is the clear winner.
| Heating System | Efficiency | Energy Input (kWh) | Heat Output (kWh) | Cost to produce 10kWh heat (2024 UK rates) |
|---|---|---|---|---|
| Gas Boiler (85% efficiency) | 85% | 11.76 kWh gas | 10 kWh | £0.74 |
| Heat Pump (COP 3.5) | 350% | 2.86 kWh electricity | 10 kWh | £0.79 |
| Heat Pump with smart tariff | 350% | 2.86 kWh electricity | 10 kWh | £0.40 |
Ultimately, a high COP is not just a technical specification; it’s the foundation of your future energy bills. A well-designed system will achieve this, turning a higher-cost fuel (electricity) into a lower-cost heating solution.
Where to Position Your Heat Pump to Avoid Annoying the Neighbours?
The fear of a noisy heat pump is one of the biggest barriers to adoption in the UK, where homes are often in close proximity. However, noise complaints are almost always the result of an installation that has ignored clear industry regulations. The noise level of a heat pump is predictable and manageable through a mandatory procedure called the MCS 020 noise assessment. This isn’t optional; it’s a requirement for any certified installer, and it’s designed specifically to protect your neighbours. The sound is measured not at the unit, but at the nearest sensitive point, typically a neighbour’s window.
The regulations are strict. In fact, the latest MCS-020(a) standard requires the maximum allowable noise at the assessment point to be just 37 decibels (dB), down from a previous limit of 42 dB. For context, 37 dB is equivalent to a quiet library. Achieving this comes down to two factors: the unit’s intrinsic sound power level (typically 60-63 dB(A) for a domestic unit) and, crucially, its placement.
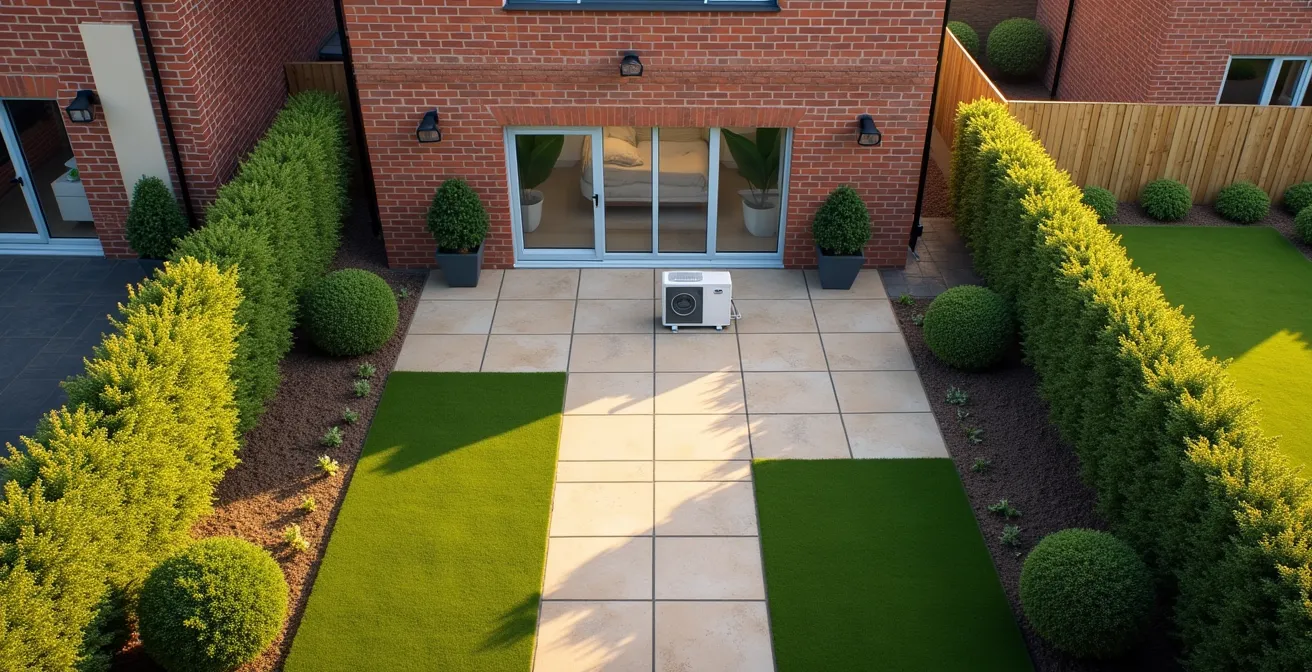
As the illustration shows, strategic placement is key. The further the unit is from the boundary, the more the sound dissipates—this is a basic principle of physics (the inverse square law). Furthermore, solid barriers like a brick wall or even a dense hedge provide significant sound reduction. A unit placed in a corner between two hard walls will be louder (as the sound reflects), while a unit in an open space is quieter. An installer following the MCS 020 procedure will calculate all of this *before* deciding on the final location to guarantee compliance.
Your Action Plan: The MCS 020 Noise Assessment Explained
- Installer obtains the A-weighted sound power level from the manufacturer’s data for the specific heat pump model.
- They determine the ‘directivity factor’ based on placement: a unit on the ground is quieter than one tucked into a corner with two reflecting walls.
- They measure the exact distance from the proposed heat pump location to the nearest neighbour’s habitable room window.
- Using a standard formula, they calculate the decibel reduction achieved purely by this distance.
- They apply corrections for any solid barriers, such as a brick garden wall, which can provide a significant -10dB reduction, and verify the final calculated level is below the 37 dB limit.
Therefore, a noisy heat pump is not a feature of the technology; it is a sign of a non-compliant installation. By insisting on a documented MCS 020 assessment from your installer, you can have complete confidence that your system will be a good neighbour.
Monobloc or Split Unit: Which Is Safer Against Freezing Risks?
The question of whether a heat pump can handle a “real” UK winter freeze is a persistent myth, often fuelled by images of iced-up units. The reality is that these machines are engineered for far colder climates than Britain typically experiences. In fact, recent climate data confirms that UK winter temperatures typically range from 0°C to 7°C, which is well within the comfortable operating range of any modern heat pump. Most quality units are designed to operate efficiently down to -15°C or even -20°C.
The choice between a ‘monobloc’ and a ‘split’ unit does have implications for freeze protection. A monobloc unit contains all the components in a single outdoor box. The water for your heating system circulates from the house, through this outdoor unit, and back. The risk here, however minimal, is that in a prolonged power cut during a deep freeze, the water in the outdoor pipes could freeze. A split unit separates the components: the fan and evaporator are outside, but the refrigerant lines run to an indoor unit where the heat exchange with your heating water happens. Since there’s no water outside, the risk of pipes freezing is eliminated.
However, manufacturers have engineered robust solutions for monoblocs. For example, Grant UK’s Aerona³ monoblocs feature factory-fitted electric heaters that automatically activate at 2.5°C to prevent any risk of condensate freezing. All heat pumps also have an automatic defrost cycle. When the unit detects ice forming on its outdoor coil (which reduces efficiency), it briefly reverses its operation for a few minutes to melt the ice before switching back to heating mode. This is a normal and essential part of its operation, often accompanied by a short burst of steam, which is sometimes mistaken for smoke.
In the context of the UK climate, the risk of a properly installed and commissioned heat pump—either monobloc or split—failing due to cold is exceptionally low. The technology’s design inherently anticipates and manages freezing conditions as a routine part of its function.
The Microbore Pipe Nightmare: Can You Install a Heat Pump on 8mm Pipes?
For homeowners in properties built or renovated in the 70s and 80s, the presence of microbore pipework (typically 8mm or 10mm) can seem like a major obstacle to installing a heat pump. This is a legitimate concern. Heat pumps work best with a higher flow rate of water than traditional boilers, and the small diameter of microbore pipes can create significant resistance, restricting this flow. A starved heat pump will operate inefficiently and struggle to heat the home. Simply connecting a new heat pump to an old, unmodified microbore system is a recipe for disaster and the source of many “horror stories.”
However, it is not an insurmountable problem. It does not automatically mean you need to rip out every pipe in your house. The solution lies in a phased and strategic upgrade. The primary goal is to ensure the heat pump itself receives the minimum flow rate it needs to operate correctly. This is often achieved by upgrading only the most critical sections of pipework first.
An intelligent approach, often recommended by experienced installers, involves several steps. The most critical part is replacing the main ‘arteries’ of the system—the primary flow and return pipes from the heat pump to the distribution manifolds—with larger 22mm or even 28mm pipes. From there, you can prioritise upgrading the pipe runs to the ground floor radiators, which do most of the work in heating the main living spaces. A buffer tank can also be installed as a form of hydraulic separation. This tank acts as a ‘shock absorber’, ensuring the heat pump always has a large volume of water to circulate through, satisfying its flow rate needs, while the central heating circuit can draw from the tank at its own, potentially slower, pace.
Here is a logical phased upgrade strategy for homes with existing microbore systems:
- Phase 1: Conduct a flow rate test on the existing microbore system to establish a baseline capacity and identify the most restrictive circuits.
- Phase 2: Replace the main flow and return pipes from the heat pump to the distribution manifold with modern 22mm or 28mm pipework.
- Phase 3: Prioritise upgrading the radiator feeds to the primary living spaces on the ground floor to 15mm pipe.
- Phase 4: If flow rate remains restricted, install a buffer tank to guarantee the heat pump’s minimum flow requirements are always met.
- Phase 5: Consider temporarily keeping the upstairs microbore sections but compensating with larger, more efficient radiators.
While microbore adds a layer of complexity, it is a known and solvable problem for a competent heating engineer. It requires a proper system design, not a simple ‘boiler swap’, reinforcing the core principle that the entire system must be considered.
Do You Really Need to Replace Every Radiator for a Heat Pump?
The belief that a heat pump installation necessitates replacing every single radiator in your house is a common and costly misconception. The truth is more nuanced and is rooted in the fundamental difference between a boiler and a heat pump: the flow temperature. A gas boiler blasts water out at high temperatures (around 70°C), while a heat pump operates most efficiently by supplying water at a lower temperature (typically 35-50°C). Because the water is cooler, the radiators need a larger surface area to transfer the same amount of heat into the room.
This is where the concept of Delta T comes in. This is the difference between the average water temperature in the radiator and the room’s air temperature. A boiler operates at a high Delta T (around ΔT50), while a heat pump operates at a lower one (e.g., ΔT30). The heat output of a radiator drops significantly at a lower Delta T. Your existing radiators might be perfectly sized for a boiler, but undersized for a heat pump.
This doesn’t mean they are all redundant. A proper room-by-room heat loss calculation will determine how much heat each room needs. You may find that modern, oversized radiators in bedrooms (like a K2 or “double panel, single convector”) are already sufficient. The main living areas, however, will likely need an upgrade. Often, simply swapping an old single-panel radiator for a modern K3 radiator (double panel, double convector) in the same footprint can double the heat output, solving the problem without any new pipework.

The following table, using data from UK radiator performance analysis, clearly shows how output changes and guides upgrade decisions.
| Radiator Type | Output at ΔT50 (Gas boiler) | Output at ΔT30 (Heat pump) | Percentage reduction | Upgrade recommendation |
|---|---|---|---|---|
| Single panel (K1) | 1000W | 510W | 49% | Replace with K2 or K3 |
| Double panel single convector (K2) | 1500W | 765W | 49% | May be adequate for bedrooms |
| Double panel double convector (K3) | 2000W | 1020W | 49% | Usually sufficient |
| Fan-assisted radiator | 2500W | 2000W | 20% | Ideal for limited space |
In summary, you will likely need to upgrade *some* of your radiators, but almost certainly not all of them. A competent installer will perform these calculations as part of the system design, providing a targeted and cost-effective upgrade plan.
Why Does a 100mm Air Gap Kill Traffic Noise Better Than 20mm?
While the noise of the heat pump unit itself is a primary concern, the overall quietness of your home depends on its ability to block external sounds in general. This is where the building’s “fabric”—its walls, windows, and insulation—plays a crucial role. Improving your home’s thermal insulation as part of a “fabric first” approach has a powerful secondary benefit: acoustic insulation. The same principles that stop heat from escaping also stop sound from getting in. Windows are often the weakest link in this acoustic barrier.
Standard double glazing has an air gap of around 16-20mm. This is effective at reducing heat loss but has its limits for sound. The two panes of glass, being of similar thickness and close together, can vibrate in sympathy, allowing certain sound frequencies to pass through. To achieve a significant improvement in noise reduction, you need to decouple these vibrations, which is achieved by increasing the air gap. This is the principle behind secondary glazing, where a second window is installed inside your existing one, creating a large air gap of 100mm or more.
The physics is simple: the wider air gap acts as a much more effective buffer, dampening the sound waves as they try to pass from the outer pane to the inner one. In fact, while standard double glazing might achieve a sound reduction of around 35 dB, properly installed secondary glazing with a 100mm gap can exceed a 50 dB reduction. This is a logarithmic scale, meaning the perceived noise level is more than halved. Using different thicknesses of glass for the inner and outer panes (e.g., 6mm outer, 4mm inner) further enhances this effect by breaking up resonant frequencies.
Upgrading your glazing is not just about heat; it’s a critical part of creating a peaceful indoor environment, whether you’re blocking out traffic noise or the sound of your neighbour’s lawnmower. For anyone concerned about the low-frequency hum of a heat pump, ensuring your windows are up to scratch is a vital first step, as it tackles the path through which the noise would enter the home.
Ultimately, a quiet home is a system. It combines a well-placed, compliant heat pump with a building fabric that effectively blocks sound transmission, with windows being the most critical element to address.
Key Takeaways
- A heat pump’s success is determined by the quality of the entire system design, not just the unit itself.
- UK regulations (MCS 020) are in place to ensure heat pumps are not a nuisance to neighbours, making noise a preventable issue.
- Existing UK housing stock, including homes with microbore pipes and older radiators, can be adapted for heat pumps with a strategic, calculated upgrade plan.
Fabric First or Heat Pump First: Which Sequence Is Safer?
The “fabric first” principle is a cornerstone of energy-efficient building in the UK. It dictates that you should prioritise improving the building’s envelope—its insulation, windows, and airtightness—before upgrading the heating system. This sequence is not just a recommendation; it is the safest and most economically sound strategy. Reducing your home’s heat loss first means you can then install a smaller, cheaper, and more efficient heat pump that will cost less to run. Installing a large, powerful heat pump in a draughty, uninsulated house is a recipe for high bills and poor performance.
For example, extensive heat loss calculations reveal that simply upgrading your loft insulation from a minimal 100mm to the recommended 270mm can reduce the required heat pump size by 15-20%. This could be the difference between needing a 7kW unit versus a 5kW unit, with corresponding savings on the initial purchase.
This strategic sequencing is also crucial for maximising UK government grants. The Boiler Upgrade Scheme (BUS) currently offers £7,500 towards the cost of a heat pump installation. Separately, schemes like ECO4 provide funding for insulation measures to eligible households. The optimal strategy is to first explore and secure any available funding for fabric improvements via ECO4. Once the insulation is upgraded, a new heat loss calculation is performed. This lower heat demand allows for the specification of a smaller heat pump, the cost of which is then offset by the £7,500 BUS grant. This approach maximises the value of both schemes and ensures the lowest possible long-term running costs.
A case study of a 4-bed 1990s detached house in Milton Keynes illustrates this perfectly. The home already had cavity wall insulation and double glazing (a decent “fabric” starting point). This allowed for the successful installation of a 10kW ASHP with only partial radiator upgrades. The system performed well even at -5°C, demonstrating that when the fabric is reasonable, the heat pump can do its job effectively.
Therefore, the question isn’t whether to choose fabric or the heat pump; it’s about doing them in the right order. Fabric first always leads to a better, more affordable, and more efficient heating system in the long run.
Which Low-Carbon Heating System Suits a 1990s Detached House Best?
A 1990s detached house represents a very common type of UK property and a perfect candidate for a low-carbon heating retrofit. These homes typically have cavity walls (often insulated) and standard double glazing, giving them a better thermal performance baseline than older properties. However, they were built for powerful gas boilers, so a direct swap to a low-temperature heat pump requires careful consideration. The best system is not a one-size-fits-all solution but a choice based on budget, ambition, and the home’s specific characteristics.
For most, a well-sized Air Source Heat Pump (ASHP) as a standalone system is the most direct and effective choice. After the £7,500 Boiler Upgrade Scheme grant, the installation cost is competitive. As demonstrated in a Milton Keynes case study, a typical 4-bed detached home could be successfully heated by a 10kW ASHP, requiring only about 40% of radiators to be upgraded and taking just a few days to install. This provides a complete move away from fossil fuels.
A more cautious approach is the Hybrid System, which pairs a smaller ASHP with the existing gas boiler. The heat pump handles the majority of the heating demand during milder weather, with the gas boiler only kicking in on the very coldest days. This reduces the need for radiator upgrades and provides a psychological safety net, but it is more expensive to install and doesn’t fully decarbonise the home. A third, highly effective option is to pair the ASHP with Solar PV. The solar panels can generate free electricity during the day to help run the heat pump, dramatically reducing running costs and maximising the system’s green credentials, albeit at a higher initial investment.
The table below summarises the key trade-offs for a typical 1990s UK detached home, helping to clarify the best path forward based on individual priorities.
| System Type | Installation Cost (after BUS grant) | Annual Running Cost | EPC Improvement | Installation Time |
|---|---|---|---|---|
| ASHP Only | £5,000-£6,000 | £700-£1,200 | +15-20 points | 2-3 days |
| Hybrid (ASHP + Gas Boiler) | £7,000-£9,000 | £600-£1,000 | +10-15 points | 3-4 days |
| ASHP + 4kW Solar PV | £11,000-£13,000 | £400-£700 | +20-25 points | 4-5 days |
Ultimately, for a 1990s property with reasonable insulation, a standalone air source heat pump is a proven and highly suitable solution. The key to success lies not in overcomplicating the system, but in ensuring it is correctly sized and installed by a certified professional who understands the principles we have discussed.